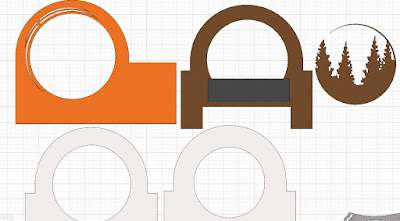
I made the snowflake snow globe earlier this week, but I'm not quite ready for winter decor here.. so I thought I would attempt modifying it to a fall design. My biggest lesson tonight? Do not use Close to My Heart paper for these - stick to plain that does not have a white core, and that IS the same color on both sides. :-)
https://www.etsy.com/listing/480696134/snow-globe-classic-red-truck-template
SLICE OUT ALL THE SNOWFLAKES
First I removed the snowflakes. To do this was simple, I added a circle using the shape tool, sized it to fit in the center, and slice. Repeat with each of the snowflake pieces, and with the trees.
This is a good time to go through and delete all of the extra items from the svg. The snow, the christmas tree, etc.
SAVE AS BLANK SNOW GLOBE
At this point I chose "Save AS" and saved my project as "Blank Snow Globe". Now when I want to do something different for the next holiday, I will be able to skip the steps above.ADD NEW LEAVES & ATTACH
Next I went to https://www.printablecuttablecreatables.com/product/fancy-swirls-autumn-leaves-free-svg-cutting-files/ and downloaded the leaves svg. I uploaded them to design space, then played around with some placement -
Once I liked they looked, I welded them. I SHOULD have first attached them, then checked to make sure I liked all of them lined up, THEN welded. Luckily I was happy with the way they layered, because I didn't think to just attach until it was too late.
This is what I ended up with:
And this is how they looked layered in design space:
ADD THE TRUCK
I then downloaded this truck:https://hellosvg.com/product/happy-fall-with-vintage-truck/
I really would not recommend this. The original file has a perfectly nice truck, WITH The white background. You could simply delete the tree and add a pumpkin. But I love the style of this blue truck - so I am using this one.
First I duplicated the truck, then I removed the grid in design space, so it has a white background.
(Click on the space right to the left of the 1 on the top ruler - one click will make a larger grid, two will remove the grid. Click again to bring it back)
Then I use windows snipping tool to take a screen shot of just the truck. I uploaded that screenshot to a very basic graphics program and used a paint brush to close the openings - connecting all the pieces together. Like this:
Then I uploaded that to design space, chose simple, and then erased JUST the white background. NOT any of the white details.
Save as a cut file, and I now have the solid white background to anchor my truck to in the finished snow globe.
Once in design space, be sure to resize it to the size of the truck you want in your snowglobe. And then (not shown below) change the color to white. Unless you really want it to cut in black. :-)
Note - the pumpkin shown here was miserable to cut at this size. I ended up using a different pumpkin.
CREATE YOUR LABEL
I wanted to add a label to the bottom of my globe, and I wanted Cricut to write it for me.
First, use the shape tool to add a square. Unlock it, and make it a rectangle.
I sized mine 2.523 x 0.675
Next, choose a writing font. I use free fonts, and MOST free fonts will not work as writing fonts in cricut. However, there are about 100 here that WILL write. (There are samples and links to download each font there)
For this project, I chose the font Always Here.
Once you have typed your text and chosen your font, be sure to switch it from cut to write.
Select the text box and the white rectangle, and choose Attach.
I chose to use a Precise V5 pen to write this - but there are a variety of pens that will work in the cricut with no adapter needed -
Now you are ready to click "Make it" and send it to the machine to cut!
When I did that, I found that I had a lot of different colors. Several shades of white, several yellows, etc. I went back and changed all of those so they were simpler - so all of my yellows were the same, the orange pumpkin changed to the same orange as the front and back of the snow globe, etc. That got this down to 9 mats.
HOW TO ASSEMBLE ONCE CUT
I did a step by step of how to assemble this, when making the original file. You can see it here:


Komentar
Posting Komentar